Red Velvet Cake Recipe
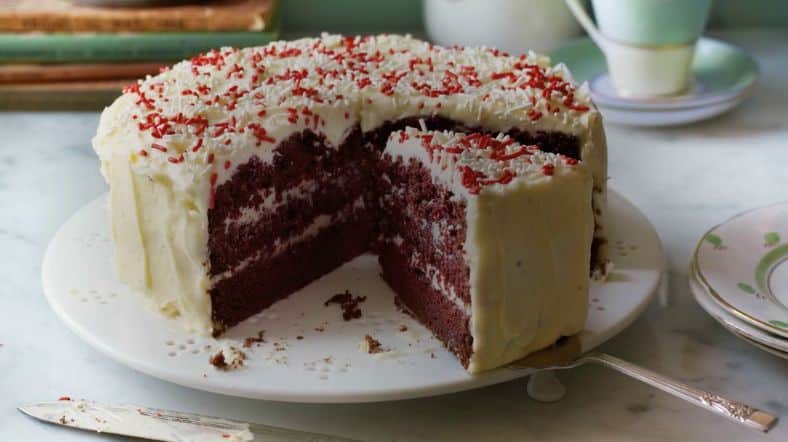
There’s something hauntingly seductive about red velvet cake. That deep crimson hue, the way it slices clean, the contrast with creamy frosting honestly, it borders on edible poetry. But let’s not get carried away with romance. If you’re a professional baker or pastry chef, you already know: behind the beauty lies science, precision, and choices that can make or break the bake.
This isn’t another basic “add cocoa, add red food coloring, now eat” kind of thing. We’re going to dig in. You want the cake that sells out before noon. The one that has people texting you at midnight asking, “Hey, you got any of that red velvet left?” Yeah, that one. That’s what we’re making.
Why Red Velvet Isn’t Just Chocolate Cake in Drag
Let’s settle something right now. Red velvet cake is not just chocolate cake with red dye. That’s like saying champagne is just sparkling wine. Technically not wrong, but spiritually… it’s an abomination.
Red velvet has less cocoa—usually just a tablespoon or two—and that cocoa plays background, not lead. It’s about tang. A kiss of acid from buttermilk and vinegar. It’s about texture. A tight, fine crumb that eats like a whisper but holds its shape like a firm handshake. Moist but not wet. Soft but not soggy. A contradiction that works.
The Science of Moisture: It’s More Than Just “Don’t Overbake It”
Alright, let’s talk moisture. If you’re still depending solely on buttermilk for softness, you’re missing the point. The secret lies in how you build moisture retention across three phases: fat choice, liquid balance, and structural agents.
Use oil instead of butter—or better yet, do a combo. Butter gives flavor, oil gives longevity. Butter cakes dry out faster. That’s a fact. Use ½ cup of unsalted butter plus ½ cup neutral oil (canola or grapeseed). You get the mouthfeel of butter but the moisture retention of oil. Win-win.
Then there’s the liquid. Buttermilk is your MVP, but here’s the twist: add a touch of hot coffee. Not much, just ¼ cup. Coffee enhances the cocoa (science), but more importantly, hot liquid blooms it. Makes the cocoa do a little dance. You won’t taste coffee—it disappears—but what you will taste is a deeper, fuller cake. That’s what we want.
Add a bit of sour cream too—2 tablespoons. Think of it as the moisture insurance policy. The unsung hero. Keeps crumb tender, plays nice with baking soda, and sneaks in a bit more acid for tang.
That Color? You’re Doing It Wrong.
Most people dump in whatever red food coloring they’ve got lying around. Here’s the thing: cheap dye tastes bitter. You’ve tasted it. That slight metallic note that ruins an otherwise great slice? Yeah. That’s bad dye.
Use a professional-grade gel or paste color. AmeriColor “Super Red” or Chefmaster “Red Red” are top-tier. They’re concentrated, so you use less. No metallic aftertaste. No pink streaks. Just bold, velvety crimson.
Add the dye to your cocoa and hot coffee first. Let it bloom. That color needs fat and liquid to spread evenly. Dumping it into the batter later just means streaks and pockets. You want consistency, not surprise tie-dye.
Structure Matters: Why Eggs, Flour, and Leavening Deserve Respect
Three large eggs. Room temp. No excuses. Cold eggs mess with emulsion. Whip them with the sugar until the mixture goes from yellow to pale and fluffy—about 3 minutes. This step isn’t optional if you care about lift.
Use cake flour. Not AP. Cake flour is lower in protein, which means less gluten. Less gluten means softer cake. If you don’t have it, sub in 1 cup of all-purpose minus 2 tablespoons, then add 2 tablespoons of cornstarch. Sift it like your life depends on it.
Now for the leavening: it’s a delicate balance. You’ll need baking soda and vinegar—the classic red velvet chemical romance. Vinegar reacts with soda to lift the batter. But use too much soda and the cake tastes soapy. Keep it tight. ¾ tsp soda. 1 tsp vinegar. Stir the vinegar in at the end, right before it hits the pan. That reaction’s a ticking clock.
The Secret Weapon: Simple Syrup
Here’s a pro move that separates hobbyists from bakery pros. Once your cake layers are out of the oven and cooled? Brush them with simple syrup. Equal parts sugar and water, boiled and cooled. Add a drop of vanilla or almond extract if you’re feeling fancy.
Why? It locks in moisture. You get that “two-days-later-and-still-moist” effect that bakeries charge extra for. It’s subtle. It doesn’t make the cake wet. Just luscious. Resilient. Better.
Frosting: Cream Cheese, but Make It Pipeable
Cream cheese frosting is iconic, but it’s tricky. Too soft and it slips. Too stiff and it loses that tangy joy. You want it smooth, pipeable, but stable.
Use block cream cheese, not the spreadable kind. And don’t let it get too warm. Room temp cream cheese is actually about 60°F, not 72°F. You want it cool enough to hold its shape but soft enough to blend.
Use a 2:1 ratio of cream cheese to butter. So for 16 oz cream cheese, use 8 oz butter. Sift your powdered sugar. Always. No one likes lumpy frosting. Add a pinch of salt—it cuts sweetness and balances the flavor. A little lemon zest wouldn’t hurt either.
For structure, add a tablespoon of cornstarch or meringue powder. It stabilizes without altering flavor. Now it’ll hold up for hours. Even in warmish rooms.
Bake Like You Mean It
Use 8-inch pans. Two or three, depending on how tall you want it. Don’t overfill. Line with parchment and give them a light spritz of baking spray.
Bake at 325°F, not 350°F. Slower bake = flatter layers, no doming, no cracking. Test with a skewer at 30 minutes. If it comes out with moist crumbs (not wet batter), pull it. Overbake by 2 minutes and you’ve lost the game.
Cool in pans 10 minutes, then turn out. Wrap in plastic once fully cool. Chill for a few hours or overnight before frosting. Cold cake is easier to frost, less crumbly, and absorbs syrup better.
Common Mistakes That’ll Kill Your Cake
Too much cocoa – Red velvet ain’t chocolate cake. More than 2 tablespoons and the flavor profile changes.
Skipping the vinegar – That’s not optional. It activates the soda and builds flavor. Lose it, and your cake falls flat—literally.
Using liquid dye – Cheap, weak color. Leaves weird taste. Go gel or go home.
Warm frosting – It’ll melt off your cake like a bad toupee. Chill your bowl, chill your ingredients.
Overmixing – Once the flour’s in, go easy. Mix until just combined. Every extra stir tightens the crumb.
Red Velvet Trends: Modern Twists & Market Data
In 2023, red velvet saw a resurgence in boutique bakeries and premium wedding cakes. According to IRI data, red velvet cake mixes grew 11% in U.S. retail sales year-over-year. Why? It’s nostalgia meets luxury.
Some bakers are now infusing syrups—like raspberry or rosewater—into the layers. Others are torching the cream cheese frosting or dusting with crushed freeze-dried berries. The classics are evolving, but at its core, red velvet is still about balance. Tang, color, moisture, and restraint.
Final Recipe Summary
Ingredients (for 3 x 8-inch layers)
- 2½ cups cake flour
- 1½ cups granulated sugar
- ½ cup unsalted butter, softened
- ½ cup neutral oil
- 3 large eggs, room temp
- 1 cup buttermilk
- ¼ cup hot brewed coffee
- 2 tbsp sour cream
- 1½ tbsp high-quality cocoa powder
- 2 tsp vanilla extract
- 1 tbsp red gel food coloring
- ¾ tsp baking soda
- 1 tsp white vinegar
- ½ tsp salt
Cream Cheese Frosting
- 16 oz block cream cheese, cool room temp
- 8 oz unsalted butter, softened
- 4 cups powdered sugar, sifted
- 1 tsp vanilla extract
- Pinch of salt
- Optional: 1 tbsp cornstarch for stability
The Takeaway: Precision + Passion = Red Velvet Mastery
This cake isn’t hard, but it is unforgiving. Small mistakes add up. Bad dye, overmixing, wrong flour—they’ll cost you the perfect slice. But if you get it right? Oh boy.
You’ll have a cake that cuts like butter, tastes like velvet, and haunts your customers in their dreams. In a good way.
Keep notes. Adjust humidity levels. Don’t rush the cooling. And above all—taste every component. Because red velvet done right? It’s not just a cake. It’s a flex.
Now go bake the one they’ll remember.
