Strawberry pound cake—sounds dainty, looks pretty, and tastes like nostalgia punched up with real fruit. But under that rosy glaze and sweet crumb, there’s a world of technique humming quietly in the background. If you think this is just a fruit-flavored sponge with pink frosting, sit tight. We’re digging deep today.
This isn’t just a walk-through of some recipe with berries folded in. This is for chefs, pastry pros, and serious home bakers who want to perfect a strawberry pound cake that holds its structure, bursts with flavor, and avoids every soggy-bottomed, gluey-middled mess you’ve probably had before.
Let’s not just bake. Let’s engineer this thing.
Why Strawberry Pound Cake Isn’t Just Another Cake
Here’s the deal. Pound cake is dense. On purpose. It’s meant to have weight. You’re not looking for airiness like chiffon. You want body. But strawberries? They’re mostly water. And water is the nemesis of structure in baking.
Most amateur pound cakes fall apart because they don’t balance that moisture. Or worse, they taste like bubblegum from the artificial strawberry flavoring used to “enhance” the profile.
Real strawberries, when used right, bring brightness, moisture, and acidity. But used wrong, they’ll leave your cake soggy and sunken like a bad soufflé. And nobody wants a cake that deflates like a tired balloon.
H2: What Makes the Perfect Pound Cake?
Let’s backtrack for a sec. Pound cake, traditionally, got its name because it used a pound each of flour, sugar, butter, and eggs. Heavy? You bet. But today’s pound cake is more refined, less literal. You scale the ratios to modern tastes, but the integrity—the backbone of the cake—remains.
Key goals in a professional pound cake:
- Tight but tender crumb
- Even bake with a golden crust
- Moisture without sogginess
- Flavor balance: sweet, creamy, slightly tangy
Now add strawberries into the equation, and you’ve got a puzzle. And we like puzzles, don’t we?
H2: Choosing the Right Strawberries (Yes, It Matters. A Lot.)
Don’t even think about using frozen strawberries. I mean, you can… but don’t. Unless you want a cake that weeps into itself like it just got dumped on prom night.
Use fresh, ripe strawberries, but not overripe. Overripe berries collapse in the oven and throw off too much juice. You want berries that are red all the way through with a firm bite. No white cores. No mush.
Here’s a pro move: roast your strawberries first.
H3: Roasted Strawberry Prep (The Game-Changer)
Toss 2 cups of diced strawberries with a tablespoon of sugar and a tiny pinch of salt. Roast at 350°F for about 25 mins until they caramelize and shrink down.
Why?
Because you’re concentrating the flavor while reducing moisture. This gives your cake bold strawberry flavor without turning it into a sponge bath.
Once they cool, you fold ’em in. Not before.
H2: Core Ingredients Breakdown (Use These. Don’t Improvise.)
Let’s talk ingredients. Every one of these has a job. Don’t swap stuff randomly unless you’re into baking roulette.
Butter
Use unsalted, high-fat European-style butter. It has less water and more fat. That means more flavor and a tighter crumb. Bring it to room temp but don’t let it melt into mush. You’re creaming, not making soup.
Sugar
Granulated white sugar. No brown sugar, no fancy turbinado nonsense. Brown sugar brings molasses and moisture. That’s not what we want here.
Cream the sugar and butter for at least 5 minutes. Set a timer. Let the air get in there. This step builds the cake’s backbone.
Eggs
Large, room temp. Add them one at a time. If you dump all five in at once, you’re making scrambled butter. And yes, you’re using five eggs. Not negotiable.
Flour
All-purpose flour. Don’t go fancy with cake flour here—it’s too light for this style of cake. You need that gluten to hold your berries and butter together like scaffolding.
Sift the flour with ½ tsp baking powder and ½ tsp salt. Even in pound cake, a little lift and seasoning goes a long way.
Sour Cream
Here’s where things get interesting. Full-fat sour cream brings tang and richness. It adds structure, moisture, and that subtle acidity to balance out the sugar.
You could sub Greek yogurt in a pinch, but sour cream is the GOAT here. Period.
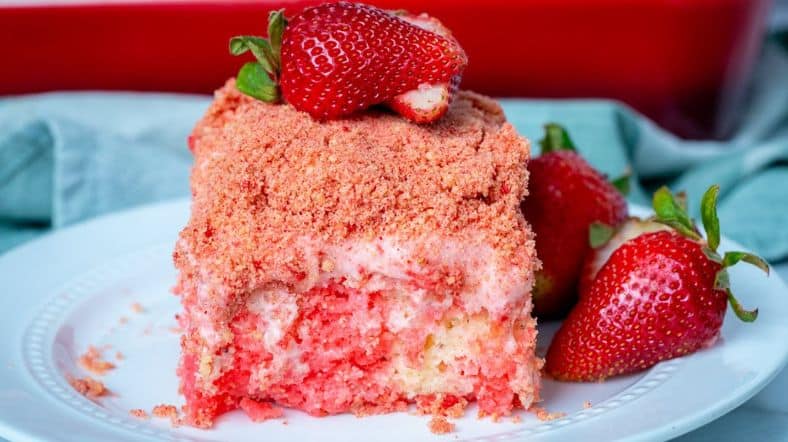
Strawberry Glaze
This is what sells the cake visually. You’ll mix powdered sugar, a bit of fresh lemon juice, and a couple tablespoons of puréed roasted strawberries until it runs thick but still pourable.
No pink food dye. No bottled syrups. You’re not making a birthday cake from a cartoon.
H2: The Real Recipe (Professional Kitchen-Ready)
Ingredients:
- 1 cup (2 sticks) unsalted butter, room temp
- 2 cups granulated sugar
- 5 large eggs
- 2¾ cups all-purpose flour
- ½ tsp baking powder
- ½ tsp fine salt
- 1 cup full-fat sour cream
- 2 tsp vanilla extract
- 1½ cups roasted strawberries (see method above)
For the glaze:
- 1½ cups powdered sugar
- 2–3 tbsp roasted strawberry purée
- 1 tbsp lemon juice
Method:
- Preheat oven to 325°F (160°C). Grease a 10-cup Bundt pan with butter and dust with flour. No cooking spray—it leaves residue.
- Cream the butter and sugar on medium-high until light and fluffy. About 5–6 minutes.
- Add eggs one at a time. Scrape the bowl after each.
- In a separate bowl, whisk flour, salt, and baking powder.
- Alternate adding dry ingredients and sour cream to the butter mixture. Start and end with flour. Don’t overmix.
- Fold in vanilla and roasted strawberries gently. Don’t smash the fruit.
- Pour batter into pan. Tap to release bubbles.
- Bake for 70–80 mins. Check for doneness at 70 with a skewer—moist crumbs are fine. Wet batter? Keep going.
- Cool in pan 15 mins, then invert and cool fully.
- Drizzle with strawberry glaze once fully cooled.
H2: Common Mistakes Even Pros Make
1. Under-creaming the butter
That’s not air in there—it’s structure. You shortchange that step, you get a flat cake.
2. Overmixing after flour goes in
The moment flour touches wet ingredients, gluten wakes up. Mix too long and your cake goes chewy. You want structure, not rubber.
3. Using raw strawberries
Just… don’t. They release way too much liquid and dilute everything.
4. Overbaking
This ain’t a crusty loaf of sourdough. You want a set but moist interior. Use a skewer and touch test the top. Slight spring-back means it’s done.
5. Pouring glaze on a warm cake
It slides right off and pools at the base like lava. Cool the cake. Be patient.
H2: Pairing and Plating—Don’t Sleep on This
A slice of strawberry pound cake begs for friends.
Try these:
- Mascarpone cream with vanilla bean
- Macerated strawberries with aged balsamic
- Toasted almond slivers on top of the glaze
Serve warm or room temp. If cold, give it 15 minutes out of the fridge before plating.
H2: Shelf Life and Storage Tips
Fresh pound cake holds up beautifully—3 days at room temp, tightly wrapped.
Fridge? Yes, but it can dry out. Only do it if it’s humid out or you’re keeping it longer.
Freezer? Absolutely. Wrap in foil and seal in a bag. Keeps for 2 months easy. Thaw overnight and re-glaze if needed.
Pro tip: toast a slice in butter for breakfast. Thank me later.
H2: Final Thoughts and Actionable Takeaways
Strawberry pound cake isn’t “just a spring dessert.” When made right, it’s a year-round showstopper that’s rich, nuanced, and deeply nostalgic.
What sets a professional version apart?
- Roasting the strawberries.
- Balancing butter, sugar, and acid.
- Controlling moisture without losing tenderness.
- Using high-quality, real ingredients—not shortcuts.
Whether you’re a restaurant pastry chef or a serious baker looking to refine your repertoire, this recipe is more than a sweet bite. It’s a case study in precision, restraint, and flavor layering.
Bake it. Tweak it. Serve it warm. And listen—don’t be afraid to fail once. The second time, you’ll knock it outta the park.
If you want a printable version or conversions for metric weights, lemme know—I’ll get you sorted.