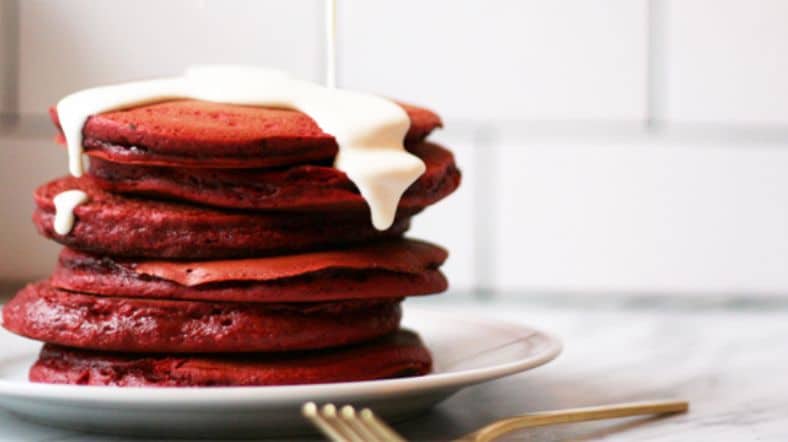
There’s a fine line between breakfast and dessert. Red velvet pancakes tiptoe that line like a tightrope walker in a buttered-up circus tent. Rich, vibrant, and unashamedly indulgent, they’re more than just a weekend treat—they’re a chef’s playground.
This isn’t your basic pancake walkthrough. This is a deep dive. We’re peeling back the layers—like good laminated dough—to unpack the what, why, and how behind making perfect red velvet pancakes that hold up under scrutiny, syrup, and a dollop of tangy whipped cream.
What Exactly Are Red Velvet Pancakes?
Red velvet is that curious creation—neither entirely chocolate nor just vanilla. It sits somewhere in between, a culinary limbo of mild cocoa, soft tang, and eye-catching red. Now, translate that into a pancake? You’ve got yourself a brunch centerpiece.
They’re not just dyed hotcakes. No ma’am.
Authentic red velvet pancakes balance cocoa, acid, and sweetness. They must be fluffy, but with enough body to carry cream cheese glaze without collapsing into sogginess. Texture is crucial—nail that, and you’re already halfway to heaven.
The Science Behind That Velvety Texture
This is where chemistry walks into your kitchen wearing an apron.
The secret lies in the reaction between acid and leavening. Buttermilk (or its cultured dairy cousins) reacts with baking soda to create carbon dioxide. This gives your pancakes their lift.
Now, cocoa powder (specifically natural, not Dutch-processed) is slightly acidic. When you mix it with buttermilk, it enhances that signature tang and helps intensify the red color.
Use too much Dutch cocoa? Pancakes’ll turn muddy brown. Use too little cocoa? They taste like plain old red-colored batter. There’s a dance here, and your ratios need to have rhythm.
Key Ingredients & Why They Matter
You don’t throw darts at a pantry and hope for the best. Each ingredient in this recipe has a role to play—and they ain’t optional.
1. All-Purpose Flour
Gives structure. Go cake flour? Too soft. Bread flour? Too chewy. All-purpose is your Goldilocks choice.
2. Buttermilk
Acid, moisture, flavor. If you swap in regular milk, add lemon juice or vinegar to fake the tang. But it’s never quite the same, trust me.
3. Cocoa Powder
Use natural unsweetened cocoa. Just one tablespoon. That’s it. Enough to flavor without overwhelming. Too much and it’s chocolate cake for breakfast.
4. Red Food Coloring
This ain’t optional. Beet juice works in theory, but the flavor’s weird and muddy. A splash of liquid food coloring or gel is your best bet. You want deep, velvet red. Not sad, rusty pink.
5. Eggs
Bind, fluff, emulsify. Two large ones. Crack ’em at room temp—cold eggs tank the batter temp and screw with your rise.
6. Sugar
A couple tablespoons. Not too much. You want the sweetness to whisper, not yell.
7. Baking Powder & Baking Soda
Baking powder gives initial rise. Soda works with the buttermilk for round two. Together, they’re pancake rocket fuel.
8. Butter (Melted)
For richness. Adds depth, keeps the texture soft. Oil works in a pinch, but it lacks that buttery bass note.
Step-by-Step: From Batter to Brilliance
You can’t just dump and stir. No sir. This isn’t a shake-n-pour Sunday.
Let’s break it down proper.
Step 1: Mix Dry Ingredients
In a large bowl:
- 1 ½ cups all-purpose flour
- 1 tbsp cocoa powder
- 2 tbsp sugar
- 1 tsp baking powder
- ½ tsp baking soda
- ½ tsp salt
Sift that cocoa, too. Lumps are nobody’s friend.
Step 2: Mix Wet Ingredients Separately
In a jug or second bowl:
- 1 ¼ cups buttermilk
- 2 large eggs
- 3 tbsp melted unsalted butter
- 1 tsp vanilla extract
- 2 tsp red food coloring (adjust to your vibe)
Whisk till smooth. Like, jazz solo smooth.
Step 3: Combine, Gently
Make a well in your dry mix. Pour in wet. Fold it together. Don’t overmix—you want lumps, tiny ones. Think rustic, not silky.
Let the batter rest 10–15 minutes. It activates the leavening and relaxes the gluten. This ain’t optional. Go answer some emails or hydrate.
Step 4: Cook Like You Mean It
Heat a nonstick skillet or griddle over medium-low. Wipe on some butter or oil. Drop ¼ cup scoops of batter onto the pan.
Don’t crowd ‘em. Flip when bubbles form and the edges look matte—about 2–3 minutes. Flip gently. Cook another minute or two.
Step 5: Stack, Dress, Devour
Serve warm. Drizzle with cream cheese glaze, maple syrup, or powdered sugar. Add berries if you’re fancy.
Quick Cream Cheese Glaze (Optional but c’mon…)
- 4 oz cream cheese (softened)
- 2 tbsp butter
- 1 cup powdered sugar
- 2–3 tbsp milk
- ½ tsp vanilla
Microwave gently. Whisk till pourable. Try not to eat it with a spoon (but no judgement if you do).
Mistakes Even Pros Make (And How to Dodge Them)
Let’s get real. Even seasoned cooks mess up a pancake stack. Red velvet ups the ante.
Mistake 1: Overmixing the Batter
That’s the number one killer of fluff. Overmixing makes gluten throw a fit. You end up with chewy discs, not pillowy clouds.
Mistake 2: Skimping on Color
Food coloring isn’t just for looks. It’s part of the red velvet experience. Go bold or go beige.
Mistake 3: Cooking Too Hot
High heat scorches the outside while the center stays raw. Medium-low heat gives you that golden edge and evenly cooked middle.
Mistake 4: Skipping the Rest Time
Resting the batter is like aging steak. Magic happens. Let it sit.
Red Velvet Pancakes in the Wild (And on Menus)
Professional kitchens are now reinventing pancakes. Not just stacks, but red velvet soufflé pancakes, Japanese-style fluffy versions, and even red velvet crepes.
According to a 2023 report by Technomic, red velvet flavor saw a 13% rise in brunch menus across upscale cafes in North America. And in Los Angeles? Good luck getting a seat at “Velvet Sunrise” on Melrose without a reservation—they build entire flights of red velvet variations, including one with candied bacon and bourbon syrup.
Emerging Trends in Pancake Innovation
2025 brunch culture isn’t just about what’s on the plate—it’s about how it photographs. The aesthetics of red velvet pancakes—rich colors, glossy glazes, contrasty toppings—are catnip for Instagram chefs and TikTok bakers.
Expect to see:
- Red velvet pancake tacos (folded with cheesecake filling)
- Savory red velvet with goat cheese and herbs
- Gluten-free beetroot-red velvet hybrids (not great, but trending)
Chefs who are reimagining classic dishes are embracing these hybrids to cater to plant-based, allergy-conscious, and aesthetic-first diners.
FAQs That Deserve Better Answers
Can I make the batter ahead of time?
Short answer: not really. The baking soda activates quickly. You can premix dry and wet separately and combine fresh in the morning.
Can I freeze them?
Yes. Cook and cool them. Freeze with parchment between each. Reheat in a toaster oven or pan.
Can I skip the food coloring?
You can, but then you’re just making faintly cocoa pancakes. Still tasty, but not the same vibe.
Final Thoughts: Pancakes as a Canvas
Red velvet pancakes aren’t just another brunch option. They’re a culinary moment. They challenge balance, texture, and plating. Get them right and they’re unforgettable.
But they take finesse. Don’t rush ’em. Respect the process. Honor the fluff.
If you’re a pro in the kitchen or a brunch entrepreneur, adding red velvet pancakes to your menu isn’t just trendy—it’s smart. They appeal to visual eaters, sweet-tooths, and nostalgia junkies in one perfect bite.
Just don’t skimp on the glaze. That’s practically pancake blasphemy.
Keywords naturally included: red velvet pancakes recipe, how to make red velvet pancakes, best red velvet pancake recipe, professional brunch recipes, cream cheese glaze for pancakes, buttermilk pancakes, red velvet breakfast ideas.
Let me know if you’d like an image set or printable recipe card to go with this!