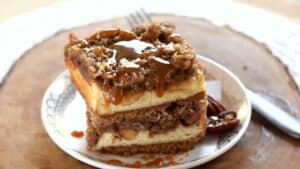
Boston Cream Poke Cake Recipe
If you’ve ever whispered sweet nothings to a Boston cream pie and secretly wished it could get messier and more sinful—meet your new obsession. Boston Cream Poke Cake ain’t just a dessert. It’s a straight-up indulgence that breaks rules and diets, and honestly? It doesn’t even apologize for it.
This ain’t your average poke cake. We’re talkin’ warm vanilla custard seeping into spongy yellow cake like it’s got unfinished business. And the glossy ganache on top? That’s not icing. That’s chocolate armor.
So why are chefs and bakers across pro kitchens and home counters gravitating toward this revamped classic? There’s layers to this. Literally. Let’s dig deep.
What Even Is a Boston Cream Poke Cake?
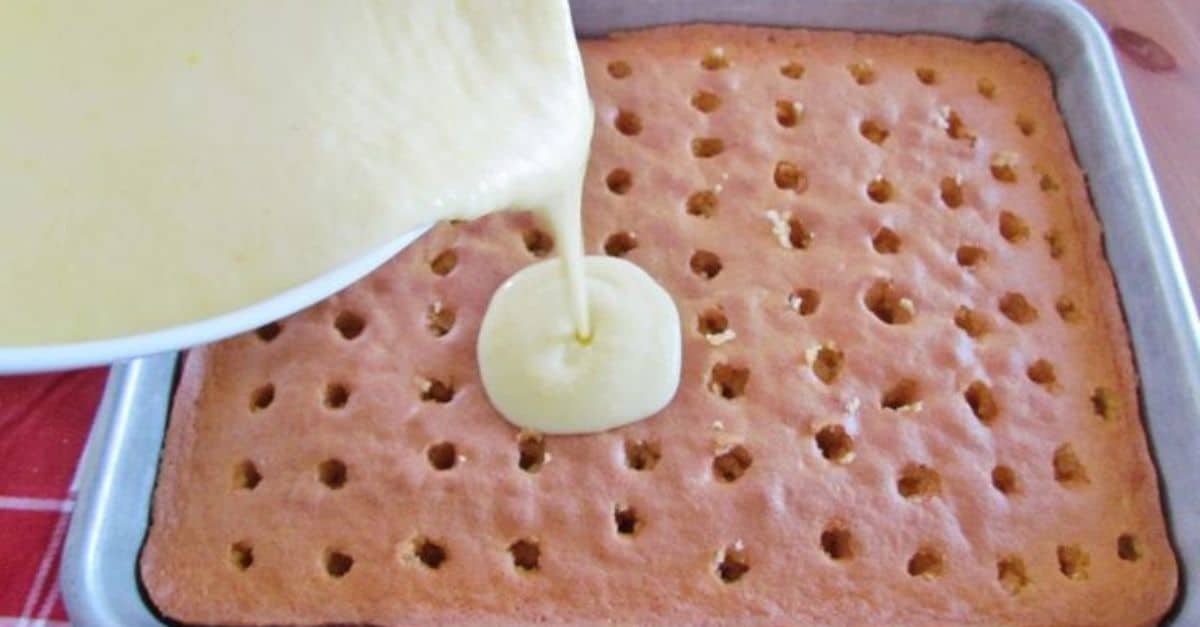
You take a yellow sheet cake—fluffy, moist, no dry crumbs allowed—and poke holes in it. Then you pour homemade pastry cream over the whole thing. And it sinks. It fills. It oozes into every cranny like sweet lava. Once it sets, you pour a shiny, slightly bitter chocolate ganache over the top.
That’s it. But also, not really.
This recipe isn’t just about combining elements. It’s a lesson in texture, in temperature control, in layering flavor profiles that punch you right in the tastebuds. A professionally made Boston Cream Poke Cake? It’s like jazz—structured chaos.
The Origins: Boston Cream Pie, Reimagined
Let’s not get it twisted. This isn’t some Pinterest-born baby. The Boston Cream Poke Cake is a reimagined version of the traditional Boston Cream Pie—a dessert that isn’t actually a pie.
That classic dish dates back to the 1850s, cooked up by French-trained Armenian chef M. Sanzian at the Parker House Hotel in Boston. The original was sponge cake split in half, filled with vanilla pastry cream, and topped with chocolate glaze. That’s your lineage. Royalty, basically.
The poke cake version started showin’ up in cookbooks and church potlucks around the ’70s and ’80s. Shortcut-friendly. More forgiving. But lately, pro chefs have been reclaiming it, tweaking it with pastry precision. We’re not using pudding mixes here. We’re talking scratch custards, stable emulsions, and tempered chocolate.
Ingredients: What You Use Matters
For the yellow cake:
- 2 1/2 cups cake flour (yes, cake flour—low protein matters here)
- 1 tablespoon baking powder
- 1/2 teaspoon salt
- 1 cup unsalted butter, room temp
- 1 3/4 cups sugar
- 4 large eggs, room temp
- 1 tablespoon vanilla extract
- 1 cup whole milk
Don’t sub in all-purpose flour unless you wanna risk a tougher crumb. Cake flour gives that velvet texture that soaks up the custard like a dream.
For the pastry cream:
- 2 cups whole milk
- 1/2 cup sugar
- 1/4 cup cornstarch
- 1/4 teaspoon salt
- 4 large egg yolks
- 2 tablespoons butter
- 2 teaspoons pure vanilla extract
Some folks try to shortcut with instant pudding. I get it. But if you want a custard that holds up, pipes well, and doesn’t turn watery by day two—do it from scratch. Stabilize it with cornstarch and yolks. And whisk like your rent’s due.
For the ganache:
- 1 cup heavy cream
- 8 oz semi-sweet chocolate (use real couverture if you can)
- Pinch of sea salt
Use chocolate that you wouldn’t mind eatin’ straight off the slab. Cheap chips give you dull, waxy results. Couverture = glossy, snappy, sexy ganache.
The Method: Step by Step, But Not Stiff
H2: Bake the Cake. But Nail the Texture.
Preheat your oven to 350°F (175°C). Grease a 9×13 inch baking pan and line it with parchment if you’re feeling pro.
Whisk the dry stuff together. In a separate bowl, beat the butter and sugar until fluffy—like clouds on a good day. Add eggs one at a time. Patience here makes or breaks emulsification. Stir in vanilla.
Alternate adding flour and milk, starting and ending with flour. Don’t overmix. Just fold ‘til combined. That’s your batter. Bake it for 28–32 minutes. It should spring back lightly when touched.
Cool it down, then use the handle of a wooden spoon to poke holes all over. Not too close. Not too far. Think goldilocks zone.
H2: Make the Pastry Cream and Pour While Warm
Scald the milk (don’t boil it). Meanwhile, whisk yolks, sugar, cornstarch, and salt. Slowly temper the yolks with warm milk—don’t scramble them. Return everything to the heat and stir ‘til thickened. When it coats the back of a spoon, it’s ready.
Add butter and vanilla at the end. Pour it while warm over the cake. It’ll sink into the holes, slow and deliberate. Smooth the top. Chill for at least 2 hours, uncovered. Don’t rush it. The fridge is your friend here.
H2: Ganache That Gleams
Heat the cream just to a simmer. Pour it over chopped chocolate. Let it sit for 1 minute. Then stir, slowly, in concentric circles, until glossy and smooth. Add a tiny pinch of salt. It wakes up the chocolate.
Pour the ganache over the chilled cake and let it spread naturally. No spatula swiping, unless you wanna dull the shine.
Let it set for at least an hour more. Overnight is better. Something happens in that fridge—science, magic, alchemy. Who knows. But the flavors meld, the cream thickens, and the ganache firms up like armor on a knight.
H2: Common Mistakes That Ruin Everything
1. Using pudding mix.
Don’t. It’s lazy, and you can taste the shortcuts. The texture is too soft, and it won’t hold under ganache.
2. Not chilling long enough.
The pastry cream needs time to firm up inside the cake. Otherwise, it’s gonna be a wet, slushy mess.
3. Cheap chocolate.
Ganache is only as good as your chocolate. Use one with high cocoa content and no waxy fillers.
4. Overmixing the batter.
This ain’t bread. You want tenderness, not chew.
H2: Variations for Pros Who Like to Break Rules
Want to flex some pastry skills? Here’s how to play around without compromising structure.
Espresso Infused Cream: Add 1 tbsp of instant espresso powder to your milk before scalding. Chocolate + coffee = grown-up dessert energy.
Caramel Ganache Topper: Swap the classic chocolate ganache with a salted caramel ganache. Butter, brown sugar, cream, white chocolate. Whip until glossy.
Boozy Cream: A splash (1-2 tbsp) of dark rum or bourbon in your custard can take it to Michelin-starred levels. Just be sure to balance sweetness.
Torch It: Right before serving, hit the ganache with a culinary torch. It adds this toasty, campfire richness that’ll have people licking the pan.
H2: Storage, Shelf Life, and Why It Gets Better with Time
Wrapped tightly, this cake lasts 4–5 days in the fridge. It actually improves overnight. The custard thickens. The cake softens. The ganache stays lush.
Don’t freeze it. Texture turns weird. Custard breaks. It’s just sad, honestly.
For service, slice with a hot knife wiped clean between cuts. Presentation matters. Nobody wants to see a mangled square on a white plate.
H2: The Takeaway—More Than a Dessert
Boston Cream Poke Cake is a study in contrast. Soft against firm. Sweet against bitter. Cold cream against rich cake. When done right, it’s architecture you can eat.
Professionals love it because it’s adaptable. Home cooks love it because it feels like cheating, even when it’s not. It’s nostalgic and new, all at once.
So next time someone says poke cakes are basic—serve ’em a slice of this. Watch their face change. That’s the moment you know you’ve nailed it.
Actionable Recap
- Use cake flour for tender sponge.
- Always make custard from scratch—no shortcuts.
- Let the custard set completely before adding ganache.
- Choose high-quality chocolate with at least 60% cocoa.
- Don’t rush—this cake rewards patience.
- Add variations carefully, keeping structural integrity in mind.
Now go bake. Make it messy. Make it brilliant. And please, for the love of ganache, don’t poke uneven holes.